Updated: 09/08/2021
Check out my YouTube video on the MOST IMPORTANT OBS settings
for quality streams! ↓
OBS is an amazing, free tool for live streaming on Twitch, Mixer and YouTube, etc! It’s also great for recording computer footage for all kinds of content. But, let’s face it, the Output and Video settings in OBS are mysterious and confusing. This article will attempt to demystify OBS settings for affiliate Twitch streamers.
OUTPUT and VIDEO in OBS settings is the focus of this article. Everyone’s setup is different, so learning what these settings do and how to configure them will yield the best results, hopefully.
This article is for new and affiliate Twitch streamers. However, Twitch Partners might find the companion article for Partners more suited for their needs. We’re assuming a SINGLE PC setup using an Nvidia video card. I will add Dual-PC OBS settings articles in the future.
Let’s get started on the Best Affiliate OBS Settings!
Output
Encoder
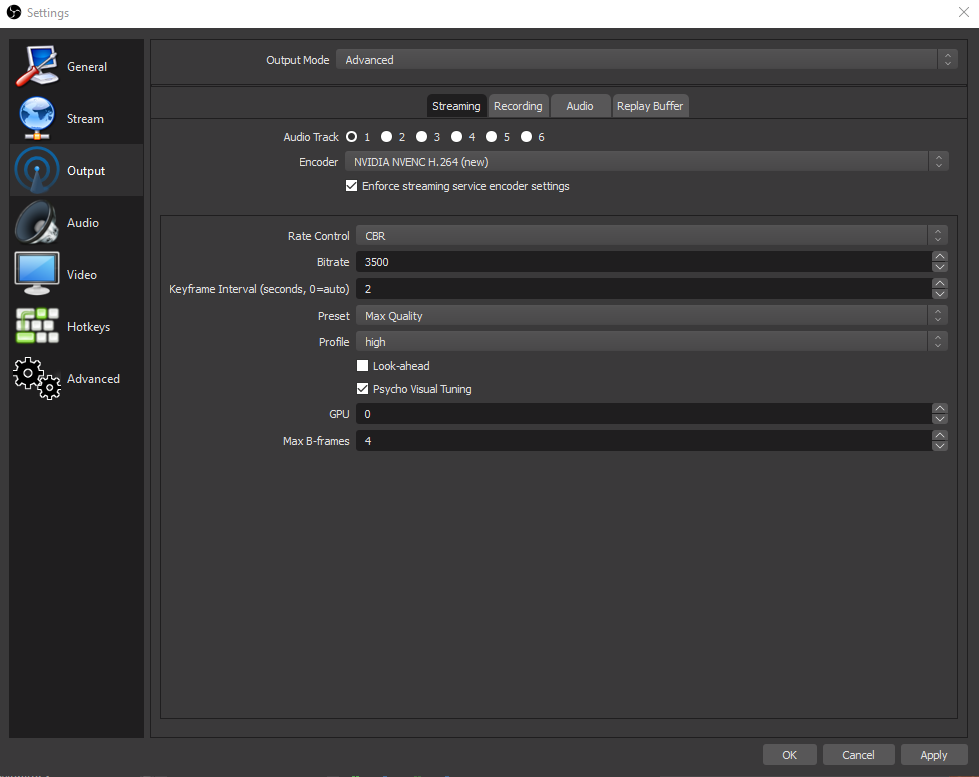
Encoder is the encoding engine used to render and encode video to be output a stream. There are two, primary types of encoder available to most streamers in OBS. GPU and CPU. For the sake of information – x264 uses the CPU to render and encode video and NVENC H.264 uses the GPU to encode video. Generally, This article will concentrate on GPU encoding – Nvidia NVENC H.264(new).
Note: “Enforce streaming service encoder settings” set to CHECKED to keep your stream’s bitrate from creeping above Twitch’s 6K cap during network congestion events.
Rate Control
Rate control determines the type of bitrate a stream well send to Twitch. CBR = Constant Bit Rate and VBR = Variable Bit Rate. For recording video, VBR works best as it uses more power to adjust the bit rate for higher quality. However, for live streaming, this variability can cause stutters and buffering. So, for live streaming CBR usually yields the best results.
Bitrate
Bitrate is the bandwidth OBS will use to send data to the Twitch ingest servers. Technically, Twitch has a cap of 6000 kbps for bitrate. New Twitch streamers and Affiliates should not stream at 6000 kbps, however. Unfortunately, Non-partnered Twitch streamers are not guaranteed ‘encoder options’. Encoder options allow a stream to down sample or up sample quality based on the viewer’s internet speed. This means if bitrate is too high, viewers with slower internet connections will not be able to watch the stream – and excluding potential viewers is never a good idea! So, that means we need to settle for a happy medium. The general rule of thumb, if upload speed ranges can handle it, is to stream with a bitrate of 3500 – 4200 for non-partnered Twitch streamers.
Note: Review this article for help in determining what your Internet’s upload speed is capable of handling.
Keyframe Interval
Twitch requires a Keyframe Interval of 2 seconds. That makes this one easy!
Preset
Preset sets the quality / performance ratio for the encoder. By default, try using the setting Quality for a good balance between a good looking stream that performs well. If you using a beefier gaming / streaming rig, Max Quality looks quite a bit better but at a cost of a heavier load on GPU. Try both and see which one works best for your rig’s capabilities.
Profile
The Profile setting determines how much CPU is used. In general, this is a good thing. Most streamers can leave this set to HIGH and be fine.
Look-ahead
The new NVENC encoder have a “smart” B-frame look-ahead feature. It doesn’t work as well as setting the Max B-Frames manually. Usually, I recommend leaving this ‘unchecked‘.
Psycho Visual Tuning
From the Nvida website: “This enables the Rate Distortion Optimization in the encoder, which greatly optimizes the way you use bitrate, improving image quality on movement. ” This is accurate, in my experience. Leave
Psycho Visual Tuning ‘checked’ to improve visual quality.
GPU
The GPU setting determines which GPU should be used for encoding. In most cases, leaving this set to 0 (zero) should be fine.
Max B-frames
If the LOOK-AHEAD option from above is ‘unchecked’, this is the option to manually set look-ahead frames. The more look-ahead frames the encoder has to sample, the better chance of a high quality frame being picked to render and encode – but at a cost of increased load on the GPU. Setting this to 4 Max B-frames gives a consistent quality result with minimal added performance hit.
Video
Base (Canvas) Resolution
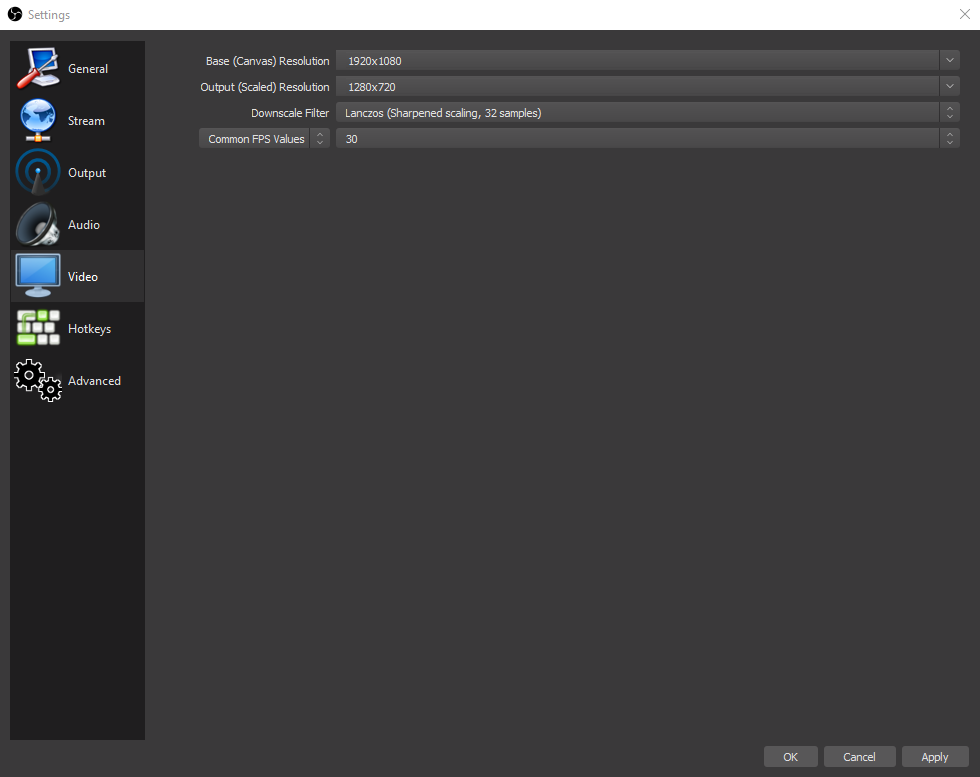
Set the Base Resolution to 1920×1080 even if the game or content is a higher resolution. This sets a standard ratio for overlays to in-game graphics.
Output (Scaled) Resolution
Set the Output Resolution to the planned streaming resolution. In this case, 1280 x 720 works best for non-partnered streamers because of the bandwidth restraints covered earlier. However, output resolution may need to be lower if upload tests yielded scores lower than 3500 kbps capable Internet connection.
Downscale Filter
Set the downscale filter to ‘Bicubic’. In my experience, this gives the sharpest, cleanest picture when scaling the output to stream.
Common FPS Values
I recommend streaming at 30 fps. The stream still looks great and it’s less stress on the GPU than 60 fps.
Happy Streaming!
Will these be the best affiliate OBS settings? With some fine tuning and trial-and-error, you’ll be getting compliments on stream quality in no time!